Category: Uncategorized

  • How to Spec an Order Insert Program: Types, Sizes, and Stock

    How to Spec an Order Insert Program: Types, Sizes, and Stock

    An order insert is the small printed card that rides along in the box, separate from the packing slip that lists what shipped. The slip is a document; the insert is a marketing decision. Done well, it turns a one-time buyer into a repeat customer for a few cents per order. Done carelessly, it is a bent card at the bottom of the mailer that nobody reads. Specifying one properly is a short sequence of decisions, and taking them in order keeps the program cheap to run and easy to measure.

    Decide what the insert is for before you design it

    An insert should have one job, and the job dictates everything downstream. The common formats each map to a different goal. A discount offer, often the single most effective insert, drives the second purchase with a credit, a percentage off, or free shipping. A thank-you card or personal note is the simplest and least expensive option and does the most for brand warmth, especially when it uses the customer’s name. A tips-and-tricks or care card reduces support tickets and returns by teaching the customer how to use what they bought. A review or social request converts a happy unboxing into public proof; one skincare brand, Frank Body, is frequently cited as having grown to hundreds of thousands of Instagram followers partly on the back of insert prompts. Product samples cross-sell an adjacent line, and a small unexpected gift buys goodwill through simple reciprocity. Trying to do all of these on one card produces a cluttered insert that accomplishes none of them, so pick the primary goal first and let the second message, if any, be clearly subordinate.

    Size the card to the package, not the other way around

    The right size is the largest card that still lies flat in your shipment without folding. A card that has to be creased to fit reads as an afterthought, and a card swimming in a big box gets lost. Discount offers are frequently printed at business-card size because it is the most economical format and slips into any mailer. Postcard and five-by-seven formats give a thank-you note room to breathe in a medium box, while a half-sheet or rack card suits a larger carton or a card that has to carry care instructions and a diagram. Start from the interior dimension of your most common mailer or box and work back to a trim size that sits inside it comfortably.
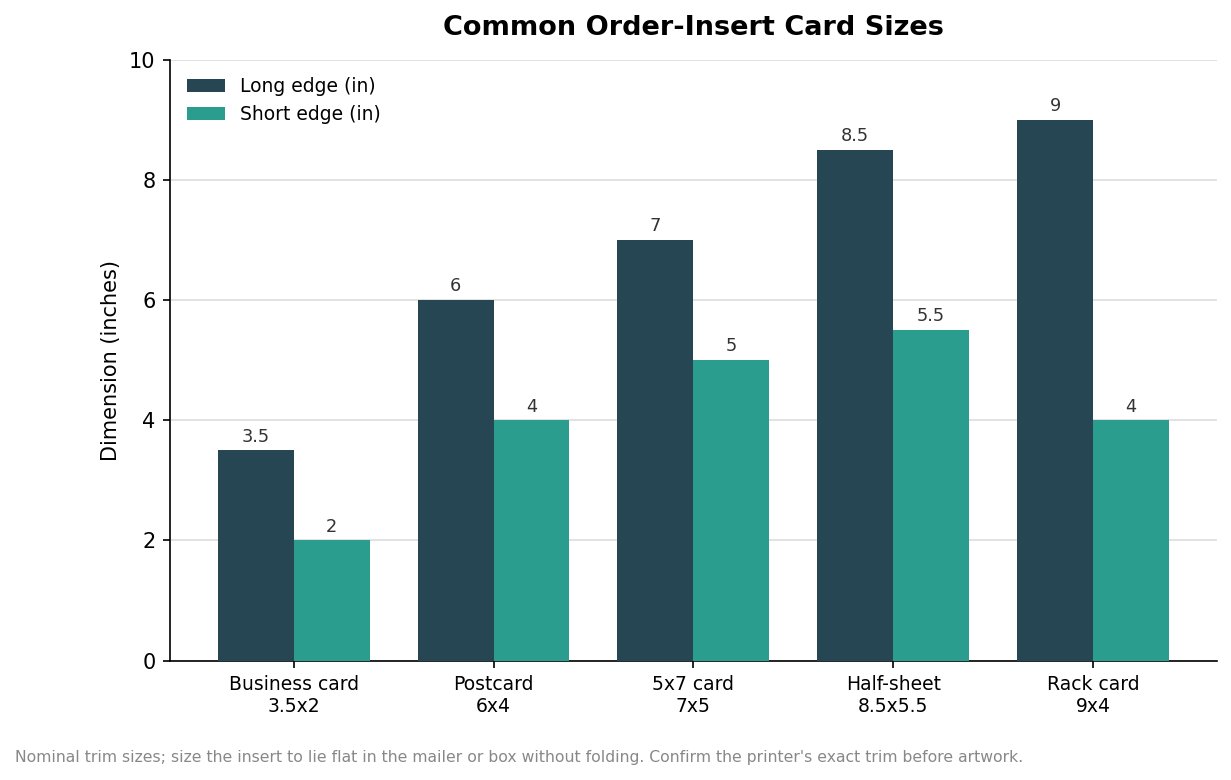
    Grouped bar chart of common order-insert card sizes in inches, showing long and short edges for business card 3.5x2, postcard 6x4, 5x7 card, half-sheet 8.5x5.5, and rack card 9x4
    Common insert trim sizes; pick the largest that lies flat in your most common package.

    Treat those dimensions as nominal trim sizes and confirm the exact figures with your printer before building artwork, since trim can vary by a sixteenth of an inch and bleed requirements differ between shops. If you ship in more than one box size, it is usually cheaper to standardize on one insert that fits the smallest common package than to run a separate size for each, because the setup and the short-run economics favor a single job.

    Choose a stock that matches the message

    Weight signals intent. A flimsy insert undercuts a premium product, while heavy card on a disposable coupon wastes money. Lightweight text stocks around 118 to 148 gsm, roughly 80 to 100 pound text, suit a foldable flyer or a care sheet that carries a lot of copy. For a card that should feel substantial in the hand, cover stocks are the norm: a 12-point board lands near 268 gsm, a 14-point near 305 gsm, and a 16-point premium card around 350 gsm. Fourteen-point is the workhorse standard for a card that has to feel like it means something, and sixteen-point is the step up when the brand is positioned as a luxury.
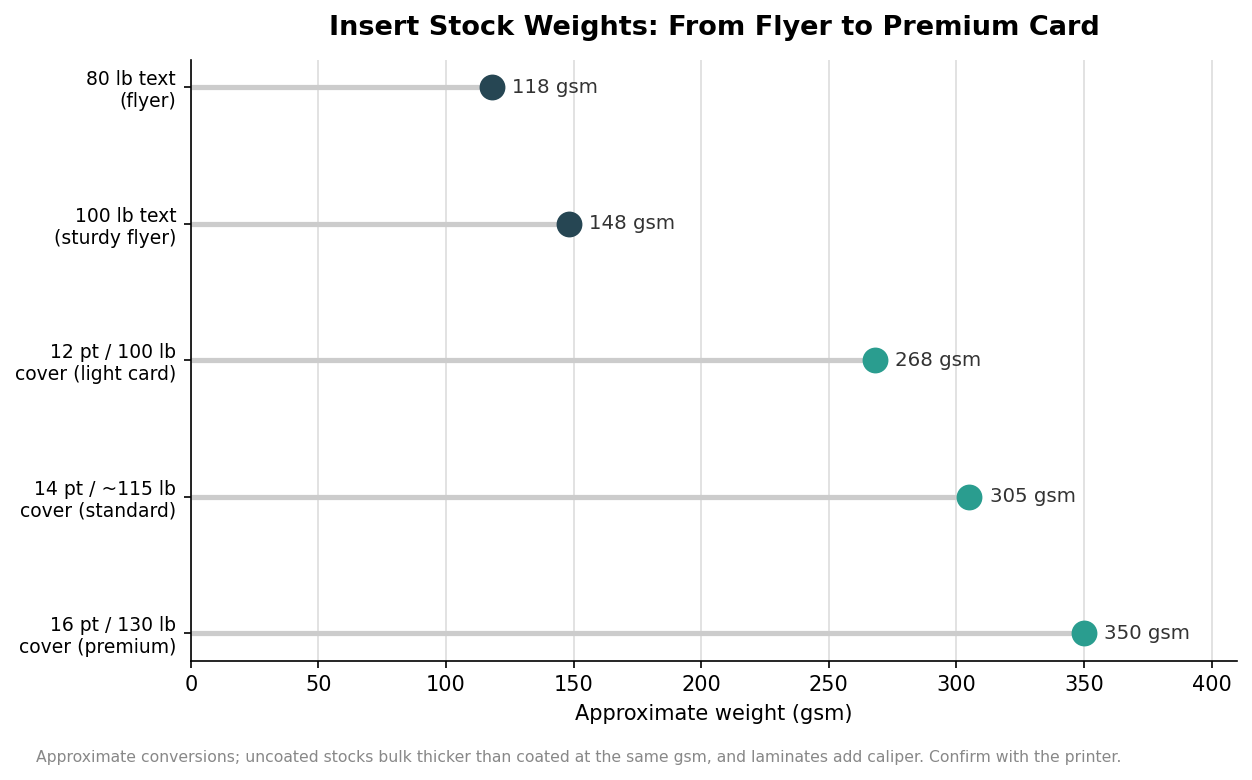
    Lollipop chart of insert stock weights in gsm rising from 80 pound text at 118 gsm and 100 pound text at 148 gsm through 12 point at 268, 14 point at 305, and 16 point premium cover at 350 gsm
    Insert stock weights from lightweight flyer to premium card, with approximate gsm.

    Two cautions keep the stock decision honest. First, these gsm figures are approximations, because an uncoated sheet bulks up thicker than a coated one at the same weight, and a laminate or soft-touch finish adds caliper on top; ask for a physical sample or a drawdown before committing a large run. Second, heavier is not automatically better. A brand that leans into recycled, unbleached kraft aesthetics can communicate more with a lighter uncoated stock than with a glossy heavyweight, so let the material match the story rather than defaulting to the thickest board on the menu.

    Static or variable: printing and personalization

    The print method follows from whether every card is identical. If the insert is the same for every order, a single static design printed in bulk is by far the cheapest route, and the per-unit cost drops sharply with quantity, which is why a static thank-you card can cost a fraction of a cent at volume. The moment you want the card to change per order, a printed customer name, a unique discount code, a product-specific care tip, you are into variable-data or digital on-demand printing, which costs more per piece but unlocks personalization and per-order tracking. A practical middle path many brands use is a static card design with a single generic code or QR, printed in bulk, which captures most of the benefit at the static price. Decide which of these three you need before you request quotes, because the cost curves are very different and mixing them up leads to sticker shock.

    Build in a way to measure it

    An insert program you cannot measure is a guess you keep paying for. The cleanest way to know whether the card works is to make its action trackable: a discount code that exists only on the insert, a QR that lands on a dedicated URL, or a review link with its own tag. Redemptions and scans then tell you the real return rather than a vibe. This is also where a return-oriented insert earns its keep, since a meaningful share of shoppers, reported by Statista at around a third, say they want a return label included with the original order, and giving them a clear returns path on the insert can lower the support burden even though it feels counterintuitive to make returning easier. Once one code is running, test a second offer against it, keep the winner, and retire the loser. That single habit, changing one variable at a time and reading the codes, turns the insert from a nice-to-have into a line item that pays for itself.
  • Designing a Packing Slip That Handles Returns Without a Support Ticket

    Designing a Packing Slip That Handles Returns Without a Support Ticket

    The packing slip is the one printed thing that lands in a customer’s hands after they buy from you, and for most brands it does nothing but list what is in the box. That is a missed job. A slip designed with returns in mind can settle the most common post-purchase question before the customer reaches for their phone, and given how expensive returns have become, the paper in the box is one of the cheapest places to intervene.

    Roughly one in five online orders comes back across all of retail, and the rate is far worse in some categories. This walkthrough covers how to design a packing slip that guides a return cleanly, nudges an exchange where one is possible, and spares your support inbox the flood of “how do I send this back” messages that follow every shipment.

    Start from the real cost of a return

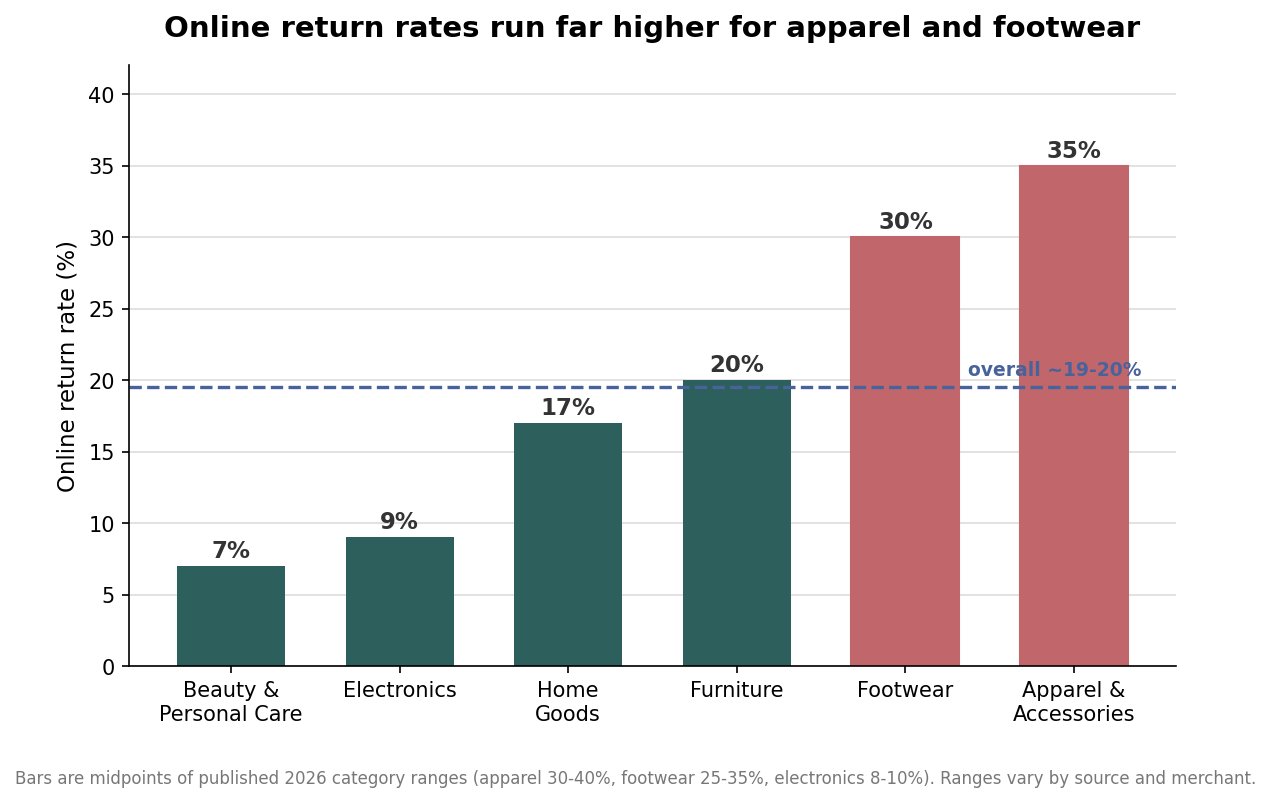
    Before designing anything, it helps to see what a return actually costs, because that number is what justifies spending an extra field or two on the slip. Published 2026 benchmarks put the overall U.S. ecommerce return rate near 19 to 20 percent, with apparel and accessories at 30 to 40 percent and footwear at 25 to 35 percent, while electronics sit lower at 8 to 10 percent and beauty lower still. In-store returns, by contrast, run a milder 5 to 9 percent, which tells you the online channel carries a structural disadvantage the slip can help offset.

    Bar chart of online return rates by category, from beauty at 7 percent to apparel and accessories at 35 percent, against a 19-20 percent overall line
    Return rates run far above the ~19-20% average in apparel and footwear, the categories where a returns-ready slip pays off most.

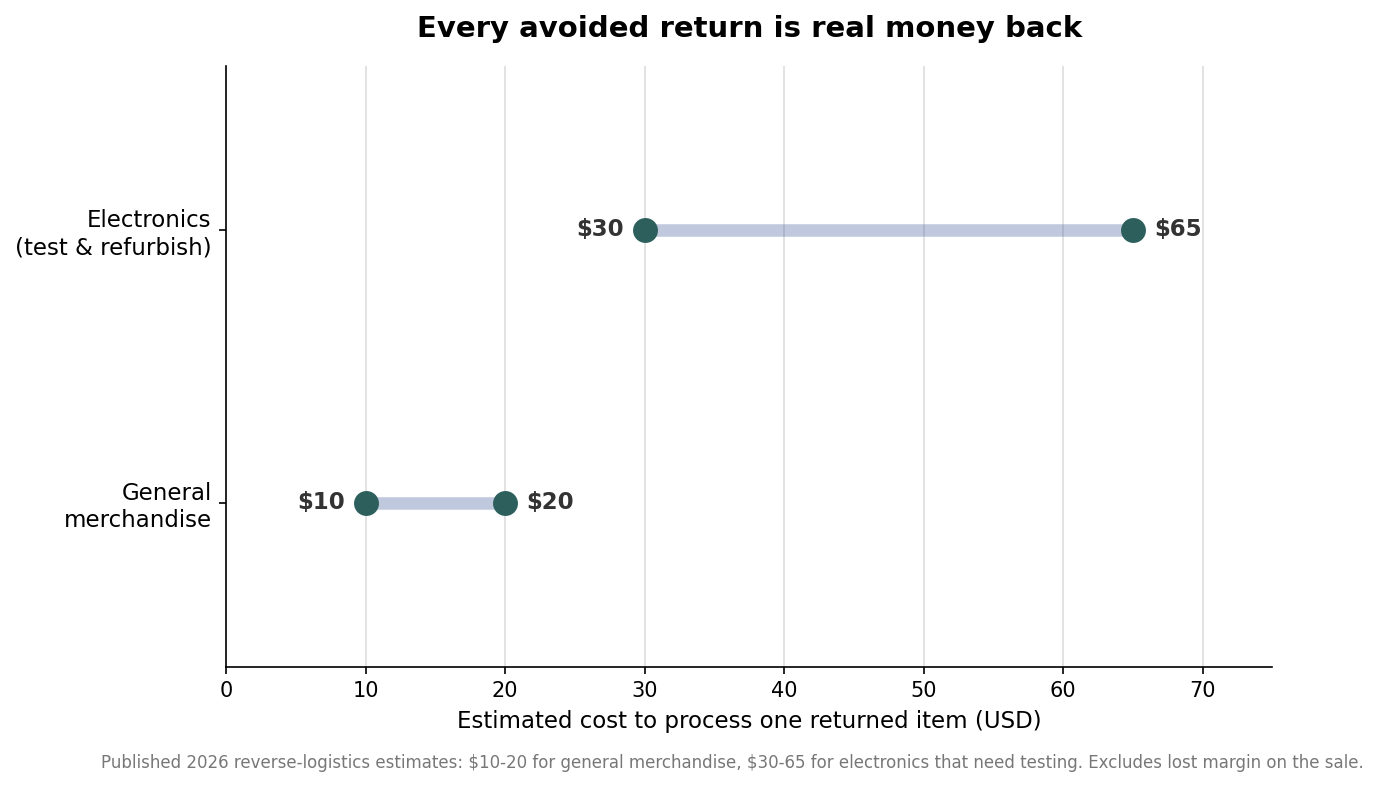
    The processing cost per return is the other half of the math. Reverse-logistics estimates land around $10 to $20 to process a returned general-merchandise item and $30 to $65 for electronics that need testing and refurbishment, and none of that includes the margin lost on the sale itself. When a return costs that much to handle, a slip that converts even a small share of returns into exchanges, or heads off a mis-routed package, pays for its own design many times over. And it matters most in January, when post-holiday returns spike 30 to 50 percent and every avoided support ticket counts double.

    Put the return path on the slip itself

    The single most useful change is to print the return path directly on the slip rather than assuming the customer will hunt for it on your site. That means the order number in large, unambiguous type, the date the return window closes stated as an actual calendar date rather than “within 30 days,” and a short URL or QR code that opens your returns portal pre-filled with that order. The goal is that a customer holding the slip never has to type an order number, dig through email, or guess when their window ends. Every one of those small frictions is a reason to email support instead, and each one is avoidable in ink.

    Printing a firm calendar date does something subtle beyond convenience: it removes the ambiguity that generates disputes. “Within 30 days of delivery” invites an argument about which day counts; “return by September 11, 2026” does not. If your system can merge that date onto each slip at print or pack time, it is worth the setup.

    Design the slip to nudge an exchange

    A return and an exchange cost you very differently. A refund is lost revenue plus reverse-logistics cost; an exchange keeps the sale and only adds the shipping. A well-built slip tilts customers toward the exchange without hiding the refund option. The practical move is to present the exchange as the default first step on the return instructions, with wording that assumes a size or color swap is the likely reason, since for apparel and footwear it usually is. Offering store credit at a small bonus, stated plainly on the slip, is another lever that turns a would-be refund into retained revenue.

    This is also where a personalized note earns its place. A slip that addresses the customer by name and references the specific product reads as service rather than paperwork, and customers extend more patience to a brand that feels attentive. The return instructions can share the same panel as a short thank-you without the slip feeling cluttered.

    Choose a format that becomes part of the return

    The physical construction of the slip can carry weight here. A perforated slip lets the customer tear off a return section to include in the box while keeping their own record, and a duplicate or carbonless format gives both the warehouse and the customer a matching copy without a second print run. For brands that run their own returns, a slip with a detachable, pre-addressed return portion turns the document itself into the first step of the process rather than a thing to be set aside and lost.

    Format also has to survive the warehouse and the round trip. A slip that will be handled, folded into a mailer, and possibly sent back should be printed on a stock heavy enough to stay legible, which is usually a bond weight rather than thin copy paper. The exact weight is a judgment call based on how the slip is handled, but the principle is simple: a slip that smears or tears defeats the purpose of printing the return path on it at all.

    Specify it so it prints right the first time

    Turning all of this into an order comes down to a few decisions. Fix the trim size to something that fits your mailers and your printer’s stock, commonly a half-letter or A5 slip for most parcels. Decide which fields merge per order, the order number, the return-by date, and the portal link or code, versus which are printed the same on every slip, such as your logo and the standing return policy. Then match the print method to the volume: variable data that changes with every order points toward digital printing, while a large run of identical branded slips can go offset for a lower unit cost.

    Range chart of estimated cost to process one returned item, $10-20 for general merchandise and $30-65 for electronics
    Processing a single return costs $10-65 before lost margin, so any slip that prevents or converts one pays for itself.

    The chart above is the reason to bother with any of this. When processing a single returned item runs from $10 into the tens of dollars, the packing slip is a rounding error by comparison, and any design choice that converts a return into an exchange, or simply stops one confused email, returns far more than it costs. Decide the fields by the job the slip has to do after the box is opened, spec the format and stock to survive that job, and the paper in the box starts working for you instead of just riding along.

  • Packing Slip vs. Invoice vs. Shipping Label: Which Document Does What

    Packing Slip vs. Invoice vs. Shipping Label: Which Document Does What

    A finished order usually leaves the building with three or four pieces of paper attached to it, and it is easy to treat them as interchangeable. They are not. A packing slip, a commercial invoice, a shipping label, and, on international freight, an export packing list each answer a different question for a different reader. Mixing them up is how a customer ends up seeing wholesale pricing they were never supposed to, or how a pallet sits in a customs queue because the paperwork was thin. This guide walks through what each document is for, what belongs on it, and where the honest overlaps are.

    What a packing slip is, and what it deliberately leaves out

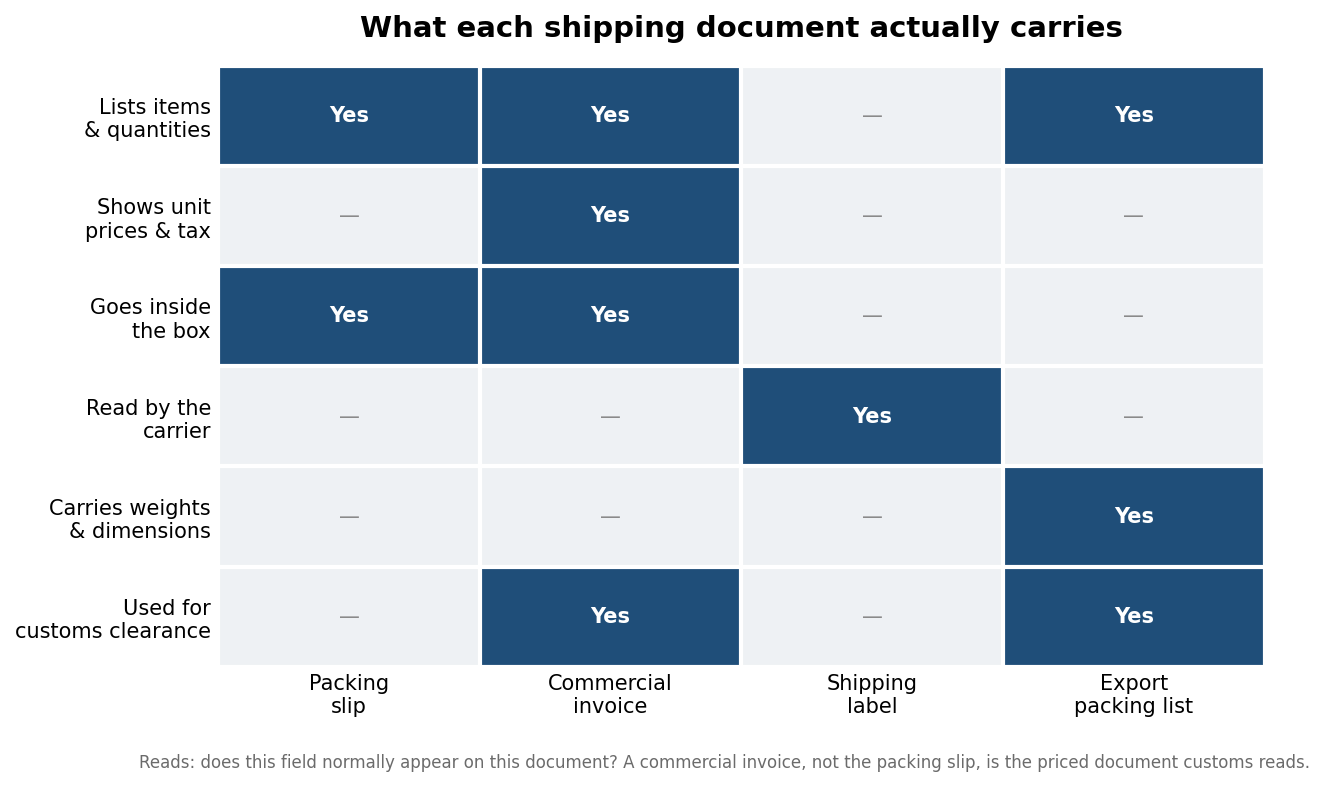
    A packing slip is a contents manifest for one specific parcel. Its job is to let two people confirm the same thing: the warehouse picker checking that the box holds what the order called for, and the customer opening it to confirm nothing is missing. To do that it lists the item names, SKUs, and quantities, the order number, and the ship-to and sold-to details. What it does not carry is money. A packing slip normally shows no unit prices, no tax, no subtotal, and no payment terms, and that omission is intentional rather than an oversight.

    The pricing exclusion matters most in two situations. The first is drop-shipping and third-party fulfillment, where the person packing the box is not the person who sold the goods, and printing the retail price would hand the end customer your supplier relationship. The second is gifting, where a recipient should not see what the sender paid. Because the packing slip is the one document that reliably travels inside the box, it is also the piece most brands treat as a branding surface, but its core contract is verification, not billing.

    Matrix showing which fields appear on a packing slip, commercial invoice, shipping label and export packing list
    Each document answers a different question; only the invoice and packing list carry the detail customs reads.

    Packing slip vs. invoice: the money question

    The invoice is the financial twin of the packing slip. Where the slip proves what shipped, the invoice records what is owed. It repeats the item lines but adds unit prices, discounts, tax, a subtotal and total, payment method or terms, and often a company logo and remit-to information. In consumer e-commerce the two frequently look similar because the same order data feeds both, but they are read by different people at different moments: the packing slip by whoever opens the box, the invoice by an accounts-payable clerk or the buyer’s records. For most direct-to-consumer orders the customer has already paid at checkout, so a separate invoice is optional and the packing slip stands in as the human-readable summary. In business-to-business selling, where terms like net 30 are common, the invoice is a distinct and legally meaningful document that should never be reduced to a slip.

    A practical test settles most disputes about which is which: if the document is meant to make someone pay, it is an invoice; if it is meant to help someone check a box against an order, it is a packing slip. When a single template tries to do both, it usually does one of them badly.

    The shipping label and the bill of lading play a different game

    A shipping label is not really a paperwork document at all in the accounting sense; it is a set of routing instructions for the carrier. It carries the destination and return addresses, a tracking barcode, the service level, package weight, and a routing or zone code that the carrier’s scanners read. It says nothing about what is inside beyond weight, and it is emphatically not customer verification. The label answers “where does this go and who moves it,” while the packing slip answers “what is in it.”

    On freight, a third document enters: the bill of lading. A bill of lading is a contract of carriage and a receipt issued by the carrier, and it governs the legal relationship between shipper and freight company. It is not a substitute for a packing slip either. A pallet can carry a bill of lading on the outside for the carrier and a packing slip or packing list inside describing the cartons, and each serves its own audience. Treating the label or the bill of lading as “the paperwork” and skipping the contents document is a common way for a receiving dock to sign for a shipment it cannot actually reconcile.

    When a full export packing list replaces the slip

    For international shipments the humble packing slip grows up into an export packing list, and the extra detail is not optional decoration. A customs officer needs to reconcile the physical shipment against the paperwork, so an export packing list typically adds gross and net weights, carton dimensions, the number of packages and how items are distributed across them, country of origin, and Harmonized System tariff codes. It travels with the shipment, usually attached externally or bundled with the freight documents rather than tucked inside a single box, and it works alongside the commercial invoice, which supplies the declared values. Thin or mismatched paperwork here has a concrete cost: shipments held for inspection, requests for clarification, and days added to a lead time that was quoted as though clearance were instant.

    The distinction between a domestic packing slip and an export packing list is really a distinction of audience. A domestic slip is written for a customer and a warehouse. An export packing list is written for a customs authority and a freight forwarder, and it assumes the reader will physically weigh and measure what it describes.

    Stacked bar chart of indicative standard fields per shipping document, split into logistics, financial and routing fields
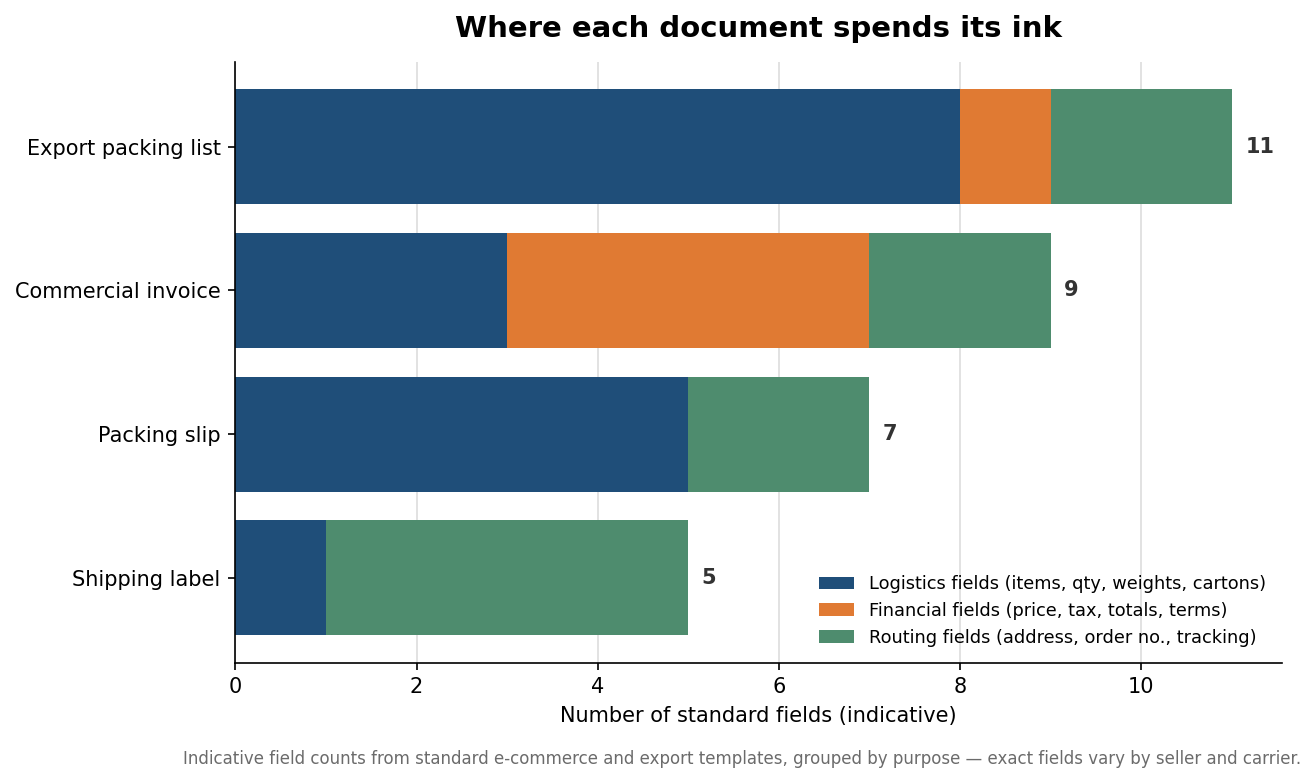
    Indicative field mix by document type, grouped by whether each field is logistics, financial, or routing information.

    Getting the fields right before you print

    The cheapest time to fix a document problem is before the run, not after a thousand slips are boxed. Decide first who each printed piece is for, then let that reader dictate the fields. If customers will see the packing slip, keep pricing off it and make the item descriptions readable rather than internal codes. If the same order needs a paying invoice, generate it as its own document with the financial fields intact. If anything is crossing a border, plan for an export packing list with weights, dimensions, and tariff codes from the start rather than upgrading a domestic slip at the dock.

    None of this requires exotic software. It requires being deliberate about the fact that a shipment usually needs more than one document, and that each one is answering a different question. Get the audiences straight and the fields follow; blur them, and you get the classic failures, a customer who saw a cost they should not have, or a pallet waiting on a form that was never filled in.

  • Packing Slip Template: The Fields Every Slip Should Include

    Packing Slip Template: The Fields Every Slip Should Include

    A packing slip is the one document your customer is guaranteed to hold. It rides inside the box, and the moment it is opened it becomes the reference the recipient uses to check that everything they ordered actually arrived. A good template makes that check effortless and quietly reinforces the brand; a sloppy one generates support tickets and returns. Whether you are building a template from scratch in a spreadsheet, configuring the one your e-commerce platform generates, or handing artwork to a printer, the questions are the same: which fields belong on it, which deliberately do not, and how the whole thing should be sized and laid out. Work through those and you have a template that serves the warehouse and the customer at once.

    The fields a packing slip should always carry

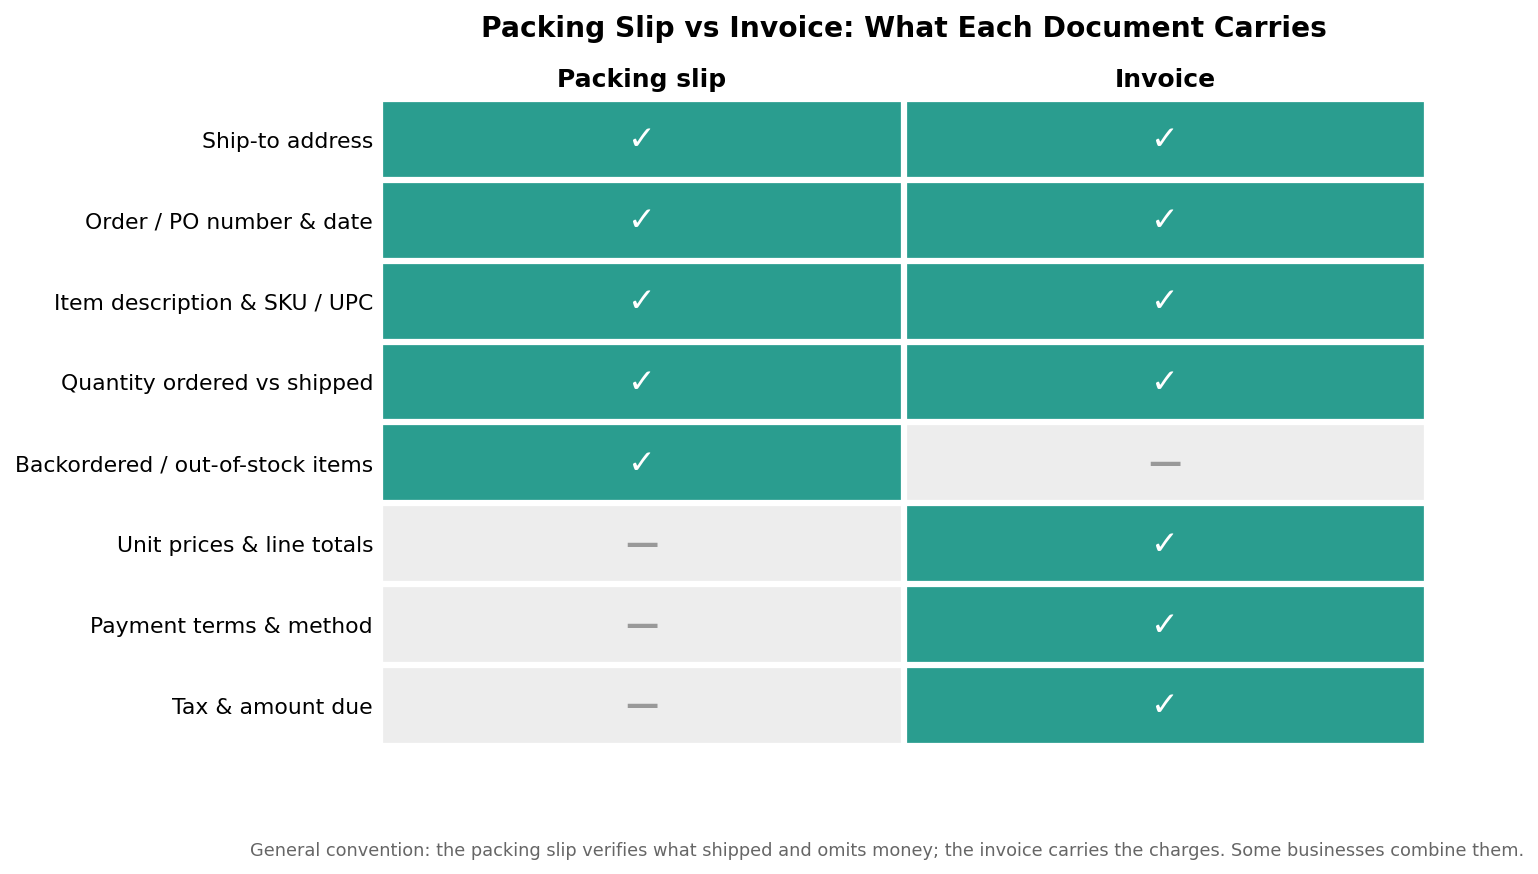
    Start with the header. Every slip needs a clear order or reference number and the order date, because that number is what ties the physical box back to the order in your system when anything goes wrong. Add the ship-to address and a line of contact information, and include your own return address or business details so the recipient knows at a glance who sent it. The body of the slip is an itemized list of what is in the box: each line showing a product description, its SKU or UPC, and the quantity. The single most useful detail here is to show quantity ordered alongside quantity shipped as two separate columns rather than one. When those numbers differ, the customer can see immediately that an item is short rather than assuming the order is complete and wrong.

    The field that separates a professional slip from a bare list is a place for backordered or out-of-stock items. Listing what did not ship, with a note that it is to follow, prevents the most common post-delivery complaint, which is a customer counting the box against their confirmation email and concluding you made a mistake. A short free-text area at the bottom for a thank-you line, a discount code, or return instructions rounds it out and costs nothing to include.

    Comparison matrix showing which fields appear on a packing slip versus an invoice; the packing slip omits prices, payment terms, and tax
    The packing slip verifies what shipped and omits money; prices, payment terms, and tax live on the invoice.

    What to leave off, and why the invoice is a different document

    The most important thing a packing slip omits is money. Prices, line totals, payment terms, method of payment, and tax do not belong on it. That is not an oversight; it is the whole distinction between a packing slip and an invoice. A packing slip verifies what physically shipped and goes to whoever receives the box. An invoice is the financial record of what was charged and goes to whoever pays the bill, who is often not the same person. Keeping prices off the slip matters practically as well as conceptually. Gift orders shipped directly to a recipient should not reveal what the buyer spent, and business deliveries frequently go to a loading dock or a front desk where pricing has no business being visible. If you ever do need one combined document, some businesses issue a packing-slip-and-invoice hybrid, but the default and the safer choice is to keep the two apart.

    Size and format the slip for the box, not the page

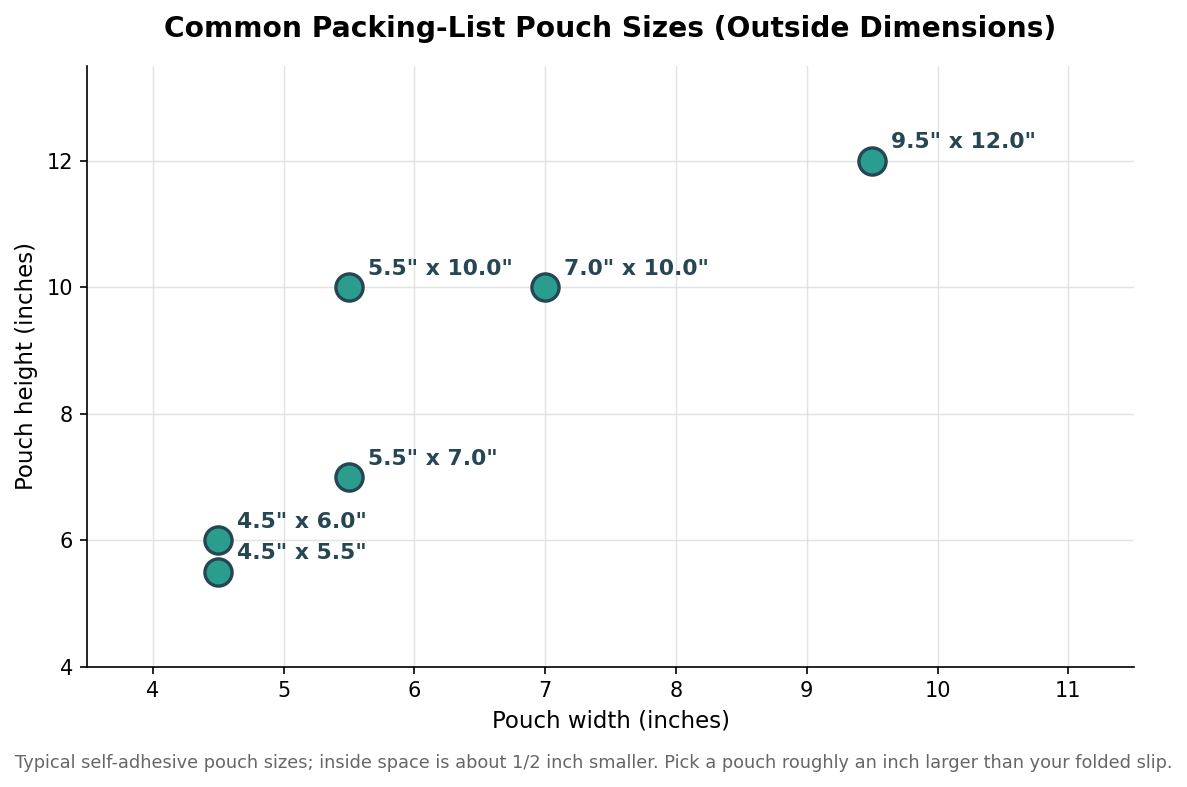
    Templates default to a full US Letter sheet at 8.5 by 11 inches, and that is fine for large or document-heavy shipments, but it is often bigger than the parcel needs. A half sheet at 8.5 by 5.5 inches, or an A5-scale slip, holds a normal order comfortably and wastes less paper and space. The dimension that actually matters is how the slip fits your packing-list pouch, the clear adhesive envelope stuck to the outside or tucked just inside the carton. Those pouches come in a handful of standard sizes, commonly around 4.5 by 5.5, 5.5 by 7, 7 by 10, and up to 9.5 by 12 inches, and the listed dimension is the outside, so the usable interior is roughly half an inch smaller on each side. The rule of thumb is to choose a pouch about an inch larger than your folded slip so it slides in and out without tearing.

    Scatter plot of common packing-list pouch sizes by width and height in inches, from 4.5 by 5.5 up to 9.5 by 12
    Size the slip to the pouch: pick a self-adhesive envelope about an inch larger than the folded slip.

    Placement is part of the format decision. A pouch on the outside of the carton lets a warehouse or a customer read the slip without opening the box, which speeds up receiving and returns, but it exposes the slip to weather, so a fully enclosed adhesive pouch matters there. Tucking the slip inside keeps the exterior clean and the contents private, which suits gift and direct-to-consumer orders. High-volume operations sometimes run a two-part or duplicate slip so one copy travels with the goods and one stays with the picker as a record, which is worth considering if your team reconciles shipments by hand rather than by scan.

    From template to printed slip

    Most sellers generate packing slips automatically, and the template is usually editable. On common e-commerce platforms the slip is driven by a template you can customize, so the work is arranging the fields above, dropping in your logo, and confirming that the ship-to block and the ordered-versus-shipped columns populate correctly from a real order before you print a thousand of them. Print a test slip and read it as a customer would, checking that nothing important is cut off at the margins and that a scanned barcode, if you use one, sits in a flat, quiet area of the layout. If you are ordering pre-printed slips rather than printing on demand, the same template thinking applies, with the branded and static elements printed in advance and the order-specific data added at pack time.

    A quick template checklist

    Before you lock a template, run it against a short list. It should show an order number and date, a ship-to address, and your return details; an itemized table with description, SKU, quantity ordered, and quantity shipped; a clearly marked section for anything backordered; and a small branded footer for a message or return policy. It should show no prices, no payment details, and no tax. And it should be sized to fold cleanly into the pouch you actually use. Get those right and the packing slip does exactly what it is supposed to do: it lets the person opening the box confirm, in a few seconds and without a phone call, that you got their order right.

  • A DTC Brand’s Guide to Packing Slip Margins — Custom Packing Slips

    Call or Text us: (929) 605-4397

    HomeBlog › A DTC Brand's Guide to Packing Slip Margins

    Economics

    A DTC Brand's Guide to Packing Slip Margins

    06/30/2026

    Packing slips are one of the smallest line items in a DTC brand’s packaging budget, and one of the easiest to underprice into unit economics as a result. Most brands assume a blank, fulfillment-software-generated slip is effectively free, and that a branded one is an unnecessary upgrade. The actual cost gap is small enough that the comparison is worth running with real numbers rather than assumptions.

    This guide walks through the per-unit cost difference between blank and branded slips, where the return on that small spend actually shows up, and what volume pricing typically looks like as your order size scales.

    The real cost gap

    A blank packing slip generated through fulfillment software carries no direct printing cost beyond ordinary office paper and toner, which is why it feels free. A branded slip, printed to spec with your logo, colors, and messaging, runs just pennies per unit depending on quantity, print method, and format — with the low end of that range reserved for higher-volume, simpler-format orders and the high end reflecting smaller runs or more complex formats like duplicate or perforated slips.

    Set against an average order value of even a modest DTC brand, that per-unit cost is a rounding error. The reason it gets scrutinized at all is that it is a visible, itemizable cost, unlike the harder-to-quantify value it returns.

    Where the ROI actually shows up

    The return on a branded slip rarely shows up as a line item you can point to directly. It shows up in three places that are each individually small but compound over a year of shipping volume. First, reduced support tickets: a slip with clear return instructions and a support contact printed on it heads off a share of “how do I return this” emails before they get sent. Second, retention: a slip that includes a loyalty signup or a next-order incentive gives a customer a reason to come back that a blank slip never offers. Third, review generation: a QR code pointed at a review page, printed where the customer will see it while unpacking the order, converts a share of satisfied customers into public reviews they would not have otherwise left.

    None of these are dramatic individually. Together, across thousands of shipments a year, they represent a return that is disproportionate to the fractional cost of the slip itself.

    Volume pricing to plan around

    Per-unit cost drops as order size increases, which means the ROI case gets stronger, not weaker, as a brand scales its shipping volume. The table below is illustrative of how typical volume pricing trends within our standard range.

    Order sizeTypical per-unit range
    1,000 unitsHighest of the range
    2,500 unitsMid-range
    5,000 unitsLower
    10,000+ unitsLowest of the range

    *Estimates only, illustrative of typical volume pricing — request a quote for your exact specs.

    Building it into your packaging budget

    The brands that get the most out of this line item treat it the same way they treat any other packaging cost: quoted and budgeted before a launch, not discovered afterward. Because per-unit cost drops meaningfully at higher volumes, it is worth quoting your expected annual volume rather than just your first order, even if you start production at a smaller quantity — it gives you a realistic sense of where your steady-state cost will land once you’re reordering regularly.

    It is also worth revisiting your format choice against your margin target periodically. A standard single-sheet slip sits at the lower end of the cost range; a duplicate 2-part or perforated format costs more per unit due to the added material and production steps. If margin is tight, standardizing on the simplest format that still supports your return and messaging needs is the most direct lever available.

    Key takeawayThe cost gap between blank and branded slips is small and shrinks further at volume — the ROI shows up in support tickets, retention, and reviews, not in the line item itself.

    Ready to upgrade your packing slips? Get a custom quote — free mockups in 24 hours. Learn more about how we work, or browse more guides.

    More posts

  • How to Order Custom Packing Slips: A Step-by-Step Checklist — Custom Packing Slips

    Call or Text us: (929) 605-4397

    HomeBlog › How to Order Custom Packing Slips

    Ordering

    How to Order Custom Packing Slips: A Step-by-Step Checklist

    05/27/2026

    The fastest quotes come from the most complete requests. A vague inquiry — “I need packing slips for my brand” — usually turns into a round of back-and-forth questions before a real quote can go out. Arriving with the right files and specs already decided cuts that time down substantially.

    Below is the checklist we walk clients through before quoting a custom packing slip order, in the order it usually makes sense to work through it.

    1. Logo and brand files

    A vector logo file — AI, EPS, or high-resolution PDF — produces the cleanest print result at any size. A PNG or JPG will work for an initial mockup, but expect a request for a vector file before the design goes to production, since raster logos tend to lose sharpness at print resolution. If you have brand color codes in Pantone or CMYK, include them; matching from a screen color alone introduces guesswork that a vector-plus-color-code combination avoids entirely.

    2. Format decision

    Decide which packing slip format fits your use case before requesting a quote: a Standard Packing Slip for straightforward single-sheet orders, a Duplicate 2-Part Slip if you need a retained warehouse copy, or a Perforated Order Slip if you want customers to tear off a return authorization or coupon. If you are unsure, a quote request can include a question about which format fits your order profile — but having a default preference in mind speeds things up.

    3. Order volume

    Minimum order quantity is 12 packs across every format. Pricing improves at higher volumes, so it helps to know both your immediate order size and your expected reorder cadence, since a brand planning to reorder every quarter may want to lock in a larger initial run rather than repeating the minimum every time.

    4. Variable data needs

    If every slip needs to show unique information — a customer name, a distinct order number, a personalized message — that is a variable data requirement, and it determines which print method fits your order. Digital printing supports full variable data; offset printing does not, since it prints the same fixed design across the entire run. Know this before you get a quote, since it changes both the print method and, at high volumes, the cost structure.

    5. Timeline

    Standard turnaround is 2 weeks for bulk production once artwork is approved (faster turnaround available with express shipping), with a free mockup delivered within 24 hours of your initial request. If you are working against a launch date or a seasonal deadline, flag that timeline up front — it does not usually change the process, but it helps set expectations on proofing rounds.

    Checklist summary

    StepWhat to have ready
    1. Logo and brand filesVector logo file (AI, EPS, or high-res PDF), Pantone or CMYK color codes
    2. Format decisionStandard, Duplicate 2-Part, or Perforated — or a note that you need help deciding
    3. Order volumeImmediate quantity (12-pack minimum) and expected reorder cadence
    4. Variable data needsWhether every slip needs unique text, which determines offset vs. digital
    5. TimelineTarget ship date, especially for launches or seasonal deadlines

    What happens after you submit these

    With logo files, format, volume, variable data needs, and timeline in hand, a mockup typically goes out within 24 hours, showing your logo and layout on the format you selected. Once you approve the mockup, the order moves to production and bulk orders generally ship within about 2 weeks. Most delays in this process come from waiting on final logo files or a format decision, not from production itself — which is exactly why having this checklist ready in advance shortens the whole timeline.

    Key takeawayArrive with a vector logo, a format decision, your order volume, variable data needs, and a timeline — it turns a multi-round quote request into a same-day mockup.

    Ready to upgrade your packing slips? Get a custom quote — free mockups in 24 hours. Learn more about how we work, or browse more guides.

    More posts

  • Standard vs. Duplicate vs. Perforated Slips: Which Holds Up Best in the Warehouse — Custom Packing Slips

    Call or Text us: (929) 605-4397

    HomeBlog › Standard vs. Duplicate vs. Perforated Packing Slips

    Comparison

    Standard vs. Duplicate vs. Perforated Slips: Which Holds Up Best in the Warehouse

    05/08/2026

    Not every order needs the same packing slip format. A single-item shipment with no return risk has different needs than a multi-item order that a warehouse wants a retained copy of, and both differ from an order where the customer might need to tear off a return authorization without hunting for a separate form.

    Here is how the Standard Packing Slip, Duplicate 2-Part Slip, and Perforated Order Slip compare on warehouse durability, handling, and paper-trail needs, so you can match format to how your fulfillment operation actually works.

    Standard Packing Slip

    The Standard Packing Slip is a single sheet: order details, line items, SKUs, and return instructions printed once and shipped with the order. It is the simplest format to produce and the most economical at any volume, which makes it the default choice for high-frequency, low-complexity shipments where no retained copy is needed on the warehouse side.

    Its limitation is exactly its simplicity — once the slip ships with the order, there is no internal record left behind unless your fulfillment software separately logs it. For operations that rely on the printed slip itself as a physical record, that gap matters.

    Duplicate 2-Part Slip

    The Duplicate 2-Part Slip uses carbonless paper to produce two copies in a single print pass — one ships with the order, one stays with the warehouse. This solves the paper-trail problem directly: a picker or packer can retain physical proof of exactly what was included in a shipment without relying on a scanner or a database entry, which some operations still require for auditing or high-value order categories.

    The tradeoff is unit cost and thickness. Carbonless 2-part construction costs more per unit than a standard single sheet, and the added thickness means slightly more bulk in the box, which rarely matters for a single slip but is worth knowing if you are optimizing packaging weight closely.

    Perforated Order Slip

    The Perforated Order Slip is scored to allow a section — typically a return authorization or a discount coupon — to be torn off cleanly by the customer without cutting into the order details on the rest of the page. It holds up well in transit because the perforation is designed not to separate until someone deliberately tears it, so it survives normal handling without falling apart in the box.

    This format is the strongest choice when you want the customer to take an action with part of the slip — initiating a return, redeeming an offer — while keeping the core order information intact and legible. It is less useful if your priority is an internal warehouse record rather than a customer-facing action.

    Side-by-side comparison

    FormatWarehouse durabilityPaper trailBest use case
    Standard Packing SlipHolds up fine for single-pass handlingNone retained unless logged separatelyHigh-volume, low-complexity shipments
    Duplicate 2-Part SlipSlightly bulkier, holds up well through packingFull physical copy retained at the warehouseAuditing, high-value orders, internal recordkeeping
    Perforated Order SlipPerforation stays intact until deliberately tornNone retained unless customer returns the stubReturn authorization, coupon redemption, customer action

    Choosing the right format for your operation

    Most fulfillment operations do not need to pick just one format across every order type. A common pattern is standard slips for the bulk of low-risk shipments, duplicate slips reserved for high-value or return-prone categories, and perforated slips wherever the goal is to drive a specific customer action after the box is opened. All three formats are available at a 12-pack minimum with free mockups in 24 hours and bulk orders shipping in about 2 weeks (faster turnaround available with express shipping), so testing more than one format across your order mix is a low-friction way to see what actually holds up for your volume.

    Key takeawayMatch the format to the job: standard for volume, duplicate for a retained paper trail, perforated when you want the customer to take an action.

    Ready to upgrade your packing slips? Get a custom quote — free mockups in 24 hours. Learn more about how we work, or browse more guides.

    More posts

  • Custom Packing Slips for 3PLs and Fulfillment Centers — Custom Packing Slips

    Call or Text us: (929) 605-4397

    HomeBlog › Custom Packing Slips for 3PLs and Fulfillment Centers

    3PL

    Custom Packing Slips for 3PLs and Fulfillment Centers

    04/19/2026

    A 3PL does not order packing slips the way a single DTC brand does. Instead of one design run for one label, a fulfillment center is usually managing packing slips across a dozen or more client accounts at once, each with its own branding, its own SKU structure, and its own expectations for how fast a reorder needs to turn around.

    That changes the calculus. The priority shifts from personalization for its own sake to standardization that still leaves room for each client’s brand identity, plus scannability and paper-trail requirements that keep the warehouse floor moving without errors.

    Standardize the layout, not the branding

    The most efficient approach we see from 3PL clients is a single locked layout template — consistent placement for the barcode, order number, SKU table, and ship-to block — with a swappable zone for each client’s logo and color. This keeps pick-and-pack staff working from a familiar layout regardless of which client’s order is in front of them, which reduces training time and misreads, while still letting each brand’s slip look distinct enough to satisfy their own customers.

    Locking the layout also simplifies reordering. Because the structural template does not change, a 3PL can request a new client’s branded version without redesigning the document from scratch, and can reprint an existing client’s run without revisiting layout decisions each time.

    Scannability matters more here than anywhere else

    In a single-brand DTC operation, a packing slip mostly needs to be readable by a person. In a 3PL environment processing thousands of orders a day across multiple clients, the slip also needs to be readable by a scanner, quickly, under warehouse lighting, by someone moving fast. That means barcode placement should be consistent across every client template, high-contrast print rather than light color-on-color combinations, and enough white space around the barcode that a handheld scanner does not pick up a stray design element.

    Font size for the order number and SKU list matters as well — small type looks clean on a screen but slows down manual verification on the floor. Most 3PL clients settle on a minimum body size that stays legible at arm’s length under fluorescent lighting.

    Choosing a format across multiple clients

    Different clients often need different slip formats depending on their return policy and internal recordkeeping. A duplicate 2-part slip gives a warehouse a retained copy for its own paper trail while the original ships with the order, which many 3PLs standardize on for higher-value or return-prone categories. A perforated order slip works well for clients who want the customer to be able to tear off a return authorization section without needing a separate insert. A standard single-sheet slip remains the simplest and most economical choice for high-volume, low-return categories.

    3PL considerationRecommended approach
    Multiple client brandsOne locked structural template, swappable logo and color zone per client
    Barcode scanning speedConsistent placement, high contrast, generous white space around the code
    Paper trail / returnsDuplicate 2-part or perforated formats depending on client return policy
    Reorder cadenceStandardized layout shortens turnaround on new client onboarding
    Order volume12-pack minimum per client design, volume pricing improves per client at higher counts

    Onboarding a new client account

    When a 3PL takes on a new client, the fastest path to a working packing slip is supplying the client’s logo file and brand colors against the existing locked template rather than starting a new layout conversation. Most new client designs can go from request to a 24-hour mockup and a production order shipping within about 2 weeks, which matters when a new account is trying to hit a launch date.

    Key takeawayLock one scannable, standardized layout across client accounts and swap only the logo and color zone — it speeds onboarding and keeps the warehouse floor consistent.

    Ready to upgrade your packing slips? Get a custom quote — free mockups in 24 hours. Learn more about how we work, or browse more guides.

    More posts

  • Offset vs. Digital Print: Choosing the Right Packing Slip for Your Order — Custom Packing Slips

    Call or Text us: (929) 605-4397

    HomeBlog › Offset vs. Digital Print Packing Slips

    Print Methods

    Offset vs. Digital Print: Choosing the Right Packing Slip for Your Order

    04/01/2026

    The print method behind your packing slip determines more than most brands realize — it affects unit cost at your order size, how consistent your brand colors look run after run, whether you can print different data on every slip, and how fast the order comes back to you.

    Offset and digital printing are both available on every packing slip format we produce. Neither is universally better; the right choice depends almost entirely on your order size and whether each slip needs unique information printed on it.

    How offset printing works for packing slips

    Offset printing uses fixed plates to apply ink to paper, which means the setup cost is higher but the marginal cost per unit drops sharply as volume increases. For a static design — the same logo, same layout, same message on every slip — offset is the more economical choice once you are ordering in the thousands. Color consistency is also stronger with offset, because the plates apply ink uniformly across the entire run, which matters if your brand has a specific color that needs to match exactly across a large order.

    The tradeoff is flexibility. Offset is not built for variable data — every slip in the run carries the same printed content, so it is not the right fit if you need each slip to show a unique order number, customer name, or SKU list printed directly onto the page rather than added afterward.

    How digital printing works for packing slips

    Digital printing applies ink directly from a digital file with no plates, which keeps setup cost low and makes it the practical choice for smaller orders or designs that change often. It is also the only option that supports true variable data printing — each slip can carry different text, meaning order numbers, customer names, or personalized messaging can be printed as part of the run instead of layered on separately.

    The tradeoff runs the other direction from offset: per-unit cost stays relatively flat rather than dropping much with volume, so digital becomes comparatively more expensive once an order climbs into the higher thousands. Color consistency is generally good but can show very slight variation across a very large run compared to offset’s plate-based uniformity.

    Offset vs. digital, side by side

    Turnaround is comparable for both methods on standard orders — bulk orders typically ship in about 2 weeks regardless of print method (faster turnaround available with express shipping), with free mockups delivered in 24 hours either way. The table below summarizes where each method fits best.

    FactorOffsetDigital
    Best forLarge, static runs with one fixed designSmaller runs or designs needing per-slip data
    Cost at volumeDrops sharply as quantity increasesStays relatively flat across quantities
    Variable dataNot supported — every slip is identicalFully supported — unique text per slip
    Color consistencyVery high across the full runHigh, with slight variation possible at very high volumes
    Minimum order12 packs, more economical at higher volumes12 packs, economical at any size

    Which one should you choose

    If your packing slip design is fixed and your order size is large, offset will generally give you the lowest per-unit cost and the tightest color match. If you need each slip to carry unique order information, or you are ordering a smaller quantity, digital is the more practical route. Some brands split the difference by running a static offset base design with a small digitally printed area reserved for order-specific data — ask about this hybrid approach when you request a quote if your use case calls for it.

    Key takeawayChoose offset for large, fixed-design runs where cost and color consistency matter most; choose digital when you need variable data or are ordering a smaller quantity.

    Ready to upgrade your packing slips? Get a custom quote — free mockups in 24 hours. Learn more about how we work, or browse more guides.

    More posts

  • Branded Packing Slips for DTC Brands: A Personalization & Quantity Guide — Custom Packing Slips

    Call or Text us: (929) 605-4397

    HomeBlog › Branded Packing Slips for DTC Brands

    DTC

    Branded Packing Slips for DTC Brands: A Personalization & Quantity Guide

    03/15/2026

    Every direct-to-consumer order ends with the same moment: a customer opens a box and finds a slip of paper on top. Most brands treat that slip as an afterthought — a blank order summary generated by whatever fulfillment software they happen to run. A small number of brands treat it as the last touchpoint in the unboxing experience, and print it accordingly.

    This guide covers how to think about personalizing a packing slip for the first time, and what quantity makes sense for a first branded print run, whether you are testing a new design or committing to a full rollout.

    What actually belongs on a branded slip

    Personalization does not mean redesigning the entire document. It means being deliberate about three or four elements that a blank template gets wrong by default. Logo placement is the first decision: most DTC brands put their logo in the top third of the slip, above the order details, so it is the first thing a customer sees before they even look at what they ordered. A second logo mark near the footer, next to a thank-you line, reinforces the brand without competing with the order information in the middle of the page.

    Thank-you messaging works best when it is short and specific rather than generic. A single sentence referencing the product category or a care instruction reads as considered; a paragraph of marketing copy reads as filler and slows down a customer who is trying to check their order against what is in the box. Save longer messaging for a separate insert card if you have more to say.

    QR codes have become the highest-leverage addition to a packing slip because they convert a passive document into an action. A QR code linking to a review page, a loyalty program signup, or a first-order discount for a friend gives the customer something to do with the slip instead of throwing it away immediately. Keep it to one QR code per slip — multiple codes competing for attention tend to get ignored entirely.

    Choosing a starting quantity

    The right first order quantity depends less on your total shipping volume and more on how confident you are in the design. Brands running their first branded slip typically start smaller than their eventual steady-state order, both to control cash outlay and to leave room to adjust copy or layout before locking in a larger run.

    Minimum order quantity on any of our packing slip formats is 12 packs, with free mockups delivered in 24 hours and bulk orders shipping in about 2 weeks (faster turnaround available with express shipping). Below is a rough guide to how brands at different order volumes typically use each tier.

    Quantity tierTypical use caseBest fit
    1,000First branded print run, testing a new design or message before committing furtherNew DTC brand or a design refresh
    2,500Design is proven, order volume is picking up but not yet dailyGrowing brand shipping a few hundred orders a month
    5,000Steady shipping cadence with predictable monthly order volumeEstablished brand or a seasonal product line
    10,000+High-frequency shipping, multiple SKUs, or a program run through a 3PLScaled DTC brand or multi-brand fulfillment operation

    *Estimates only, illustrative of typical order patterns — request a quote for your exact specs.

    Building personalization into your reorder cycle

    The brands that get the most value from branded slips do not treat the first print run as a one-time project. They revisit the design roughly once a year, or whenever they run a QR code promotion that needs updating, and reorder at whatever quantity tier matches their current shipping pace. Because the marginal cost of adding personalization is small relative to the base cost of printing a slip at all, there is rarely a reason to go back to a blank template once you have made the switch.

    Key takeawayStart with a focused design — logo, one thank-you line, one QR code — at a quantity that matches your current shipping volume, and revisit both as your order cadence grows.

    Ready to upgrade your packing slips? Get a custom quote — free mockups in 24 hours. Learn more about how we work, or browse more guides.

    More posts