A packing slip is the one document your customer is guaranteed to hold. It rides inside the box, and the moment it is opened it becomes the reference the recipient uses to check that everything they ordered actually arrived. A good template makes that check effortless and quietly reinforces the brand; a sloppy one generates support tickets and returns. Whether you are building a template from scratch in a spreadsheet, configuring the one your e-commerce platform generates, or handing artwork to a printer, the questions are the same: which fields belong on it, which deliberately do not, and how the whole thing should be sized and laid out. Work through those and you have a template that serves the warehouse and the customer at once.
The fields a packing slip should always carry
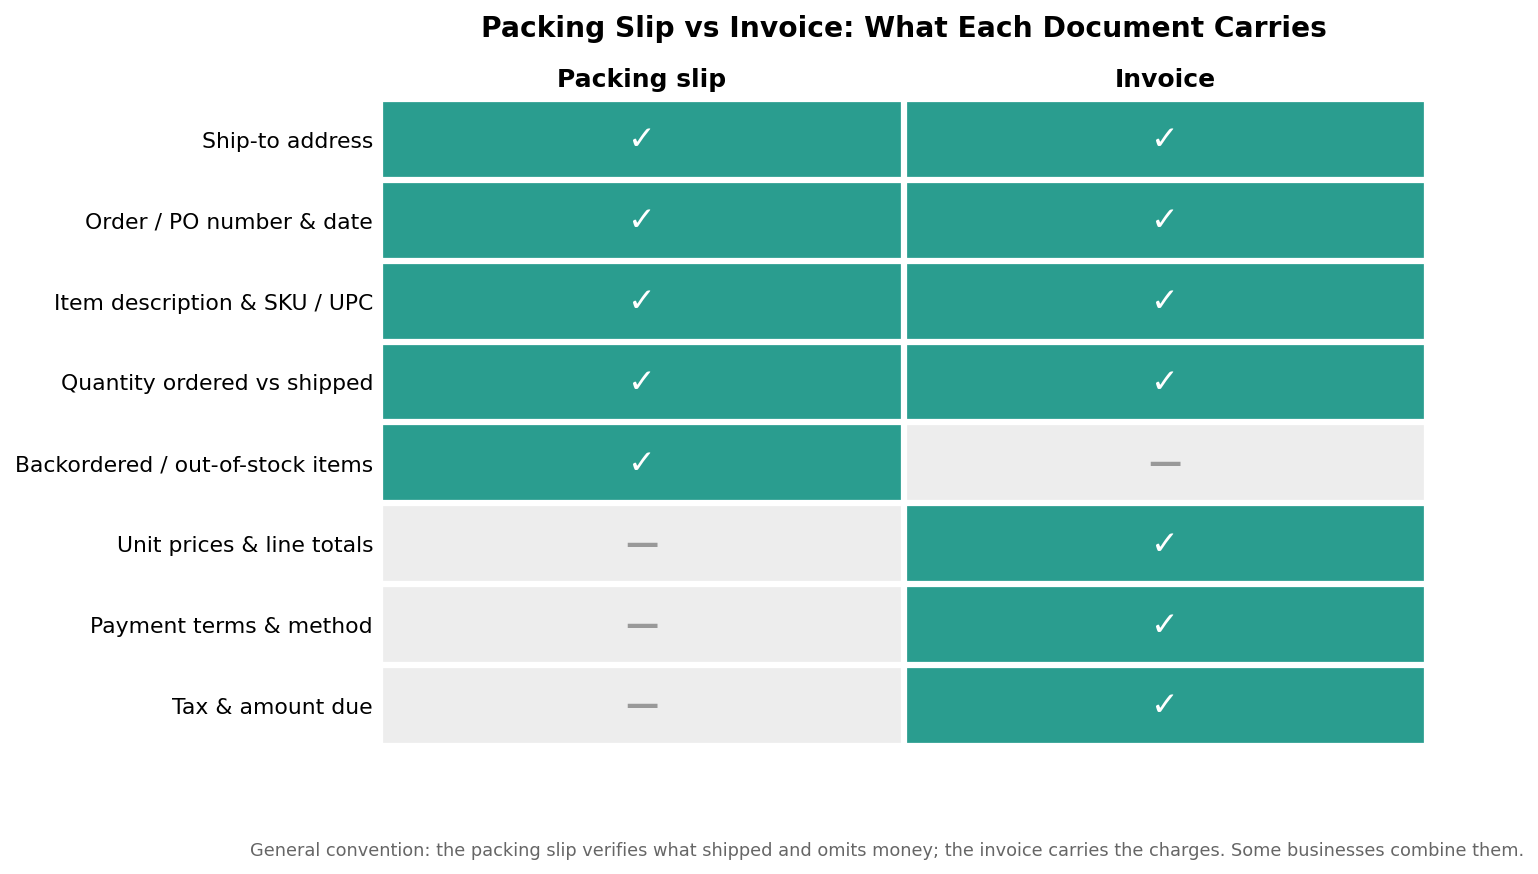
Start with the header. Every slip needs a clear order or reference number and the order date, because that number is what ties the physical box back to the order in your system when anything goes wrong. Add the ship-to address and a line of contact information, and include your own return address or business details so the recipient knows at a glance who sent it. The body of the slip is an itemized list of what is in the box: each line showing a product description, its SKU or UPC, and the quantity. The single most useful detail here is to show quantity ordered alongside quantity shipped as two separate columns rather than one. When those numbers differ, the customer can see immediately that an item is short rather than assuming the order is complete and wrong.
The field that separates a professional slip from a bare list is a place for backordered or out-of-stock items. Listing what did not ship, with a note that it is to follow, prevents the most common post-delivery complaint, which is a customer counting the box against their confirmation email and concluding you made a mistake. A short free-text area at the bottom for a thank-you line, a discount code, or return instructions rounds it out and costs nothing to include.
What to leave off, and why the invoice is a different document
The most important thing a packing slip omits is money. Prices, line totals, payment terms, method of payment, and tax do not belong on it. That is not an oversight; it is the whole distinction between a packing slip and an invoice. A packing slip verifies what physically shipped and goes to whoever receives the box. An invoice is the financial record of what was charged and goes to whoever pays the bill, who is often not the same person. Keeping prices off the slip matters practically as well as conceptually. Gift orders shipped directly to a recipient should not reveal what the buyer spent, and business deliveries frequently go to a loading dock or a front desk where pricing has no business being visible. If you ever do need one combined document, some businesses issue a packing-slip-and-invoice hybrid, but the default and the safer choice is to keep the two apart.
Size and format the slip for the box, not the page
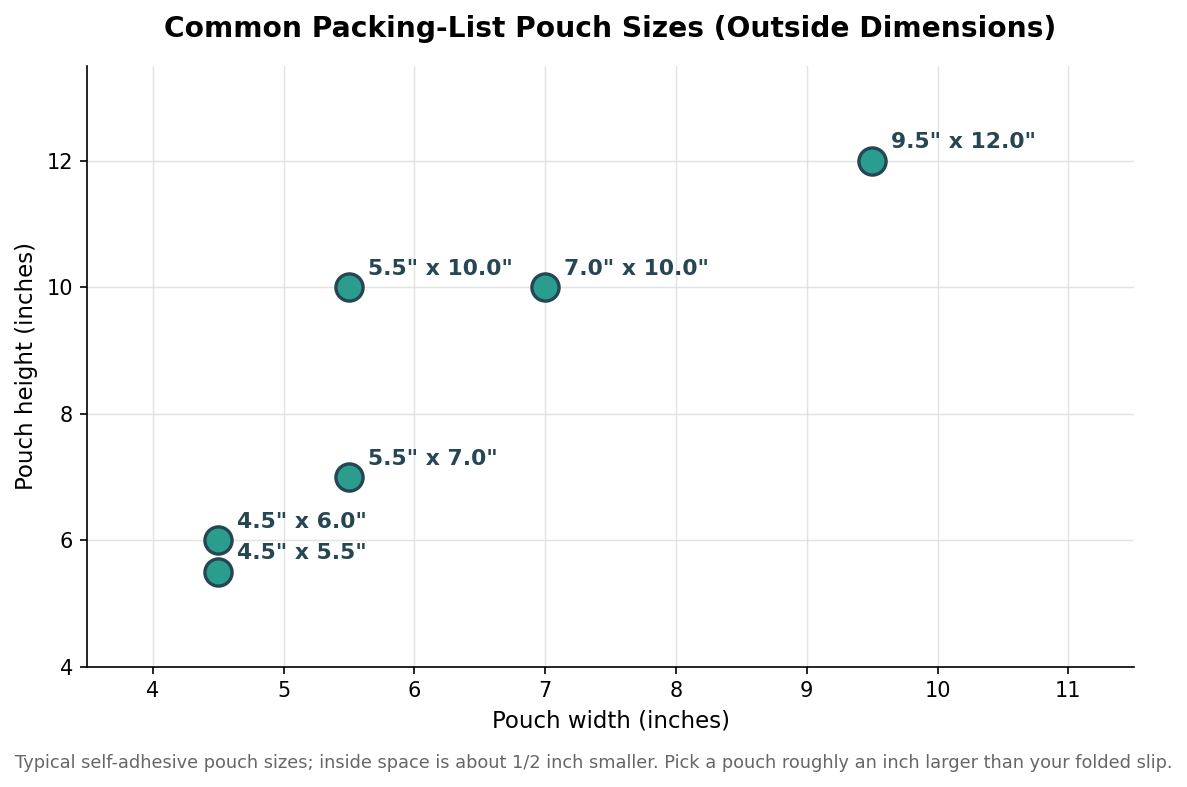
Templates default to a full US Letter sheet at 8.5 by 11 inches, and that is fine for large or document-heavy shipments, but it is often bigger than the parcel needs. A half sheet at 8.5 by 5.5 inches, or an A5-scale slip, holds a normal order comfortably and wastes less paper and space. The dimension that actually matters is how the slip fits your packing-list pouch, the clear adhesive envelope stuck to the outside or tucked just inside the carton. Those pouches come in a handful of standard sizes, commonly around 4.5 by 5.5, 5.5 by 7, 7 by 10, and up to 9.5 by 12 inches, and the listed dimension is the outside, so the usable interior is roughly half an inch smaller on each side. The rule of thumb is to choose a pouch about an inch larger than your folded slip so it slides in and out without tearing.
Placement is part of the format decision. A pouch on the outside of the carton lets a warehouse or a customer read the slip without opening the box, which speeds up receiving and returns, but it exposes the slip to weather, so a fully enclosed adhesive pouch matters there. Tucking the slip inside keeps the exterior clean and the contents private, which suits gift and direct-to-consumer orders. High-volume operations sometimes run a two-part or duplicate slip so one copy travels with the goods and one stays with the picker as a record, which is worth considering if your team reconciles shipments by hand rather than by scan.
From template to printed slip
Most sellers generate packing slips automatically, and the template is usually editable. On common e-commerce platforms the slip is driven by a template you can customize, so the work is arranging the fields above, dropping in your logo, and confirming that the ship-to block and the ordered-versus-shipped columns populate correctly from a real order before you print a thousand of them. Print a test slip and read it as a customer would, checking that nothing important is cut off at the margins and that a scanned barcode, if you use one, sits in a flat, quiet area of the layout. If you are ordering pre-printed slips rather than printing on demand, the same template thinking applies, with the branded and static elements printed in advance and the order-specific data added at pack time.
A quick template checklist
Before you lock a template, run it against a short list. It should show an order number and date, a ship-to address, and your return details; an itemized table with description, SKU, quantity ordered, and quantity shipped; a clearly marked section for anything backordered; and a small branded footer for a message or return policy. It should show no prices, no payment details, and no tax. And it should be sized to fold cleanly into the pouch you actually use. Get those right and the packing slip does exactly what it is supposed to do: it lets the person opening the box confirm, in a few seconds and without a phone call, that you got their order right.
Leave a Reply